
Keyword Extraction with NLP: A Beginner's Guide
Collecting, analyzing, and acting on user feedback is a cornerstone of the user-centered design process. User feedback helps us understand customer needs and levels of satisfaction, and can help us determine where best to focus research and design efforts in order to have the greatest impact on user experience overall.
Thanks to improved tools—and perhaps to increasing pressure to make sure customers feel “heard”—many organization have gotten pretty good at collecting user feedback. I have not seen evidence, however, that as many are as good at analyzing and acting on that feedback. Organizations may have tons of data—say, 8,000 help tickets and customer comments compiled in a single .csv*—but when it comes to what insight lies within, all too often no one has any idea.
(*True story. More than once, actually. Much more.)
Generating insight from a multi-thousand line spreadsheet of free-form user comments can be tricky. You could look at every comment (if you have the project budget for it … and no regard for your personal sanity), or you could take a sample and hope for the best.
Natural Language Processing to the Rescue
A third approach is to use Natural Language Processing (NLP) to begin to understand the overall tenor of the dataset at a high level, then use that understanding to identify more focused lines of inquiry—either for applying to the data itself, or for using to guide related research.
A wide range of free Python NLP libraries offer some relatively easy-to-deploy tools that can help us uncover key features of large datasets. The tools we’ll explore in this article will allow us to create single and multi-term keyword lists (called n-grams) from a large (3,000+ records), unstructured data set. These lists will help us frame a basic high level understanding of the dataset’s contents.

Though this process, known as “text mining,” is necessarily reductive, it offers several points of entry into a dataset that otherwise might look hopelessly impenetrable:
- Keywords themselves can be useful, particularly in formulating a response to “What are people most frequently talking/asking about?”
- Keywords can help you focus in on smaller sets of individual records in order to learn more about them and begin to answer particular questions about user needs and goals
- Keywords in combination with analysis of smaller sets of individual records can help you identify gaps in your understanding of users that can help focus subsequent research efforts
A Caveat for Less Techincal Readers
If the thought of doing anything in code has you reaching for the “close” icon, hear me out first: Up until about a month ago, I didn’t know Python from Boa Constrictor. This article and accompanying repository is intended to provide a low-barrier entry point into getting started with text analysis and text mining—even if you’re new to manipulating data files with code.
Background, Sources, and Resources
Much of the code you’ll find below (and in the corresponding GitHub repository) has been stitched together from much more knowledgeable primary sources than yours truly—ones that I heartily recommend you check out. The alterations I’ve made have been in the spirit of making these tools more accessible to beginners, of making sure the code works in a standalone repository, and of providing a starting point from which the daring among you can begin to make your own explorations.
Want to read about background and requirements later? Skip to the "How to Extract Keywords with Natural Language Processing" section below
Sources for the NLP Code Blocks
- Automated Keyword Extraction from Articles using NLP, by Sowmya Vivek, shows how to extract keywords from the abstracts of academic machine learning papers. This is the article I draw from most heavily for this toolkit. Unfortunately, (as far as I know) Ms. Vivek hasn’t shared a repository of these scripts, so I’ve recreated and modified them here.
- Extracting Keywords with TF-IDF and Python’s Scikit-Learn, by Kavita Ganesan, appears to be the tutorial Ms. Vivek draws on most heavily for the TF-IDF vectorization process (more on that particular word salad below). Ms. Ganesan provides more detail on how those particular blocks of code work, as well as additional tools in her NLP GitHub repo—a good next step for those of you interested in exploring further afield.
Python Resources
- Natural Language Processing with Python, by Steven Bird, Ewan Klein, and Edward Loper, is a free online book that provides a deep dive into using the Natural Language Toolkit (NLTK) Python module to make sense of unstructured text. It’s a solid resource for building foundational knowledge based on best practices. I found the first three chapters to be a good primer—and will likely return to the rest as a reference as my skills broaden.
- Learn to Code in Python 3: Programming beginner to advanced, by Ivan Gomes via Udemy, is an excellent introduction to Python. The course assumes no prior knowledge of Python (it starts with detailed modules on how to install it), but moves quickly enough to stay engaging and maintain a sense of progress. I highly recommend it. Also: be sure to do the exercises—they’re fun and help the content stick.
Running the Repository
The repository for this toolset of operations and functions is stored as a Jupyter Notebook file. Jupyter Notebook is an open source web application that you can use to create and share documents that contain live Python code, equations, visualizations, and text. I’ve found it to be an easy (and forgiving) way to experiment with Python and build NLP operations to accomplish specific tasks.
To run the repository, you will need to set up a few things on your computer. You’ll need Python 3, Jupyter Notebook, and a handful of Python modules. Jupyter Notebook and all the modules can be installed with the PIP package installer that comes with Python.
Here’s what you’ll want to install for modules:
- pandas for data analysis and manipulation tool
- nltk, a suite of libraries and programs for the symbolic and statistical natural language processing of English
- matplotlib for plotting data
- seaborn for data visualization
- pillow, an imaging library
- wordcloud for creating word cloud visualizations
- sklearn, a machine learning library
Once you’re up and running with Python, download the NLP Text Analysis repository from GitHub and copy the sample text files to your desktop. Run “jupyter notebook” from the repository directory, then just follow the steps listed below to generate lists and visualizations of normalized keywords and n-grams. Once you get the hang of it, swap out your own massive spreadsheet of unstructured comments and custom keywords and revel in the glory of conducting NLP text analysis all by yourself. 🎉
How to Extract Keywords with Natural Language Processing
1. Load the data set and identify text fields to analyze
Select the first code cell in the “text-analytics.ipynb” notebook and click the “run” button. Be sure to drag the “rfi-data.tsv” and “custom-stopwords.txt” files out onto the desktop; that’s where the script will look for them.
Follow the prompts to load your data. After you select your .tsv file, you’ll select the column that contains the data you want to analyze, and then review the most and least common words in the unprocessed text. These will help you identify any custom stop words you may want to add before normalizing the text.
2. Create a list of stop words
Stop words are commonly used words such as “the”, “a”, “an”, “in,” etc. that occur with high frequency in natural language, but which don’t communicate salient information about the meaning or subject of a message.
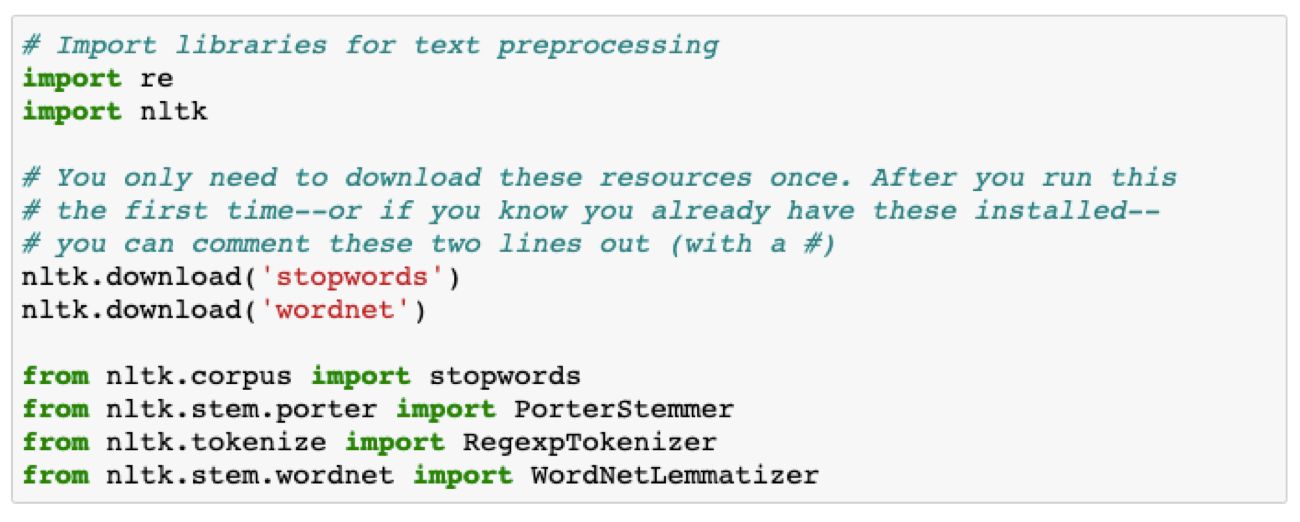
The NLTK module offers a list of the most common stop words in English, which we’ll import here. In this step, we’ll also add in a list of custom stop words based on the text we’re analyzing. You can modify this list in the “custom-stopwords.txt” file on your desktop.
The list of “most frequently occurring words” we generated above offers some good candidates for customizing the custom stop words list. As you start to generate results below, you may want to come back to this step and add in additional stop words based on your content set to generate more useful results.
3. Pre-process the data set to get a cleaned, normalized text corpus
Pre-processing includes removing punctuation, tags, and special characters from the text, and then normalizing what’s left into recognizable words. The normalization process includes “stemming,” which removes suffixes and prefixes from word roots, and “lemmatization” which maps the remaining root forms (which may not always be proper words) back to an actual word that occurs in natural language.
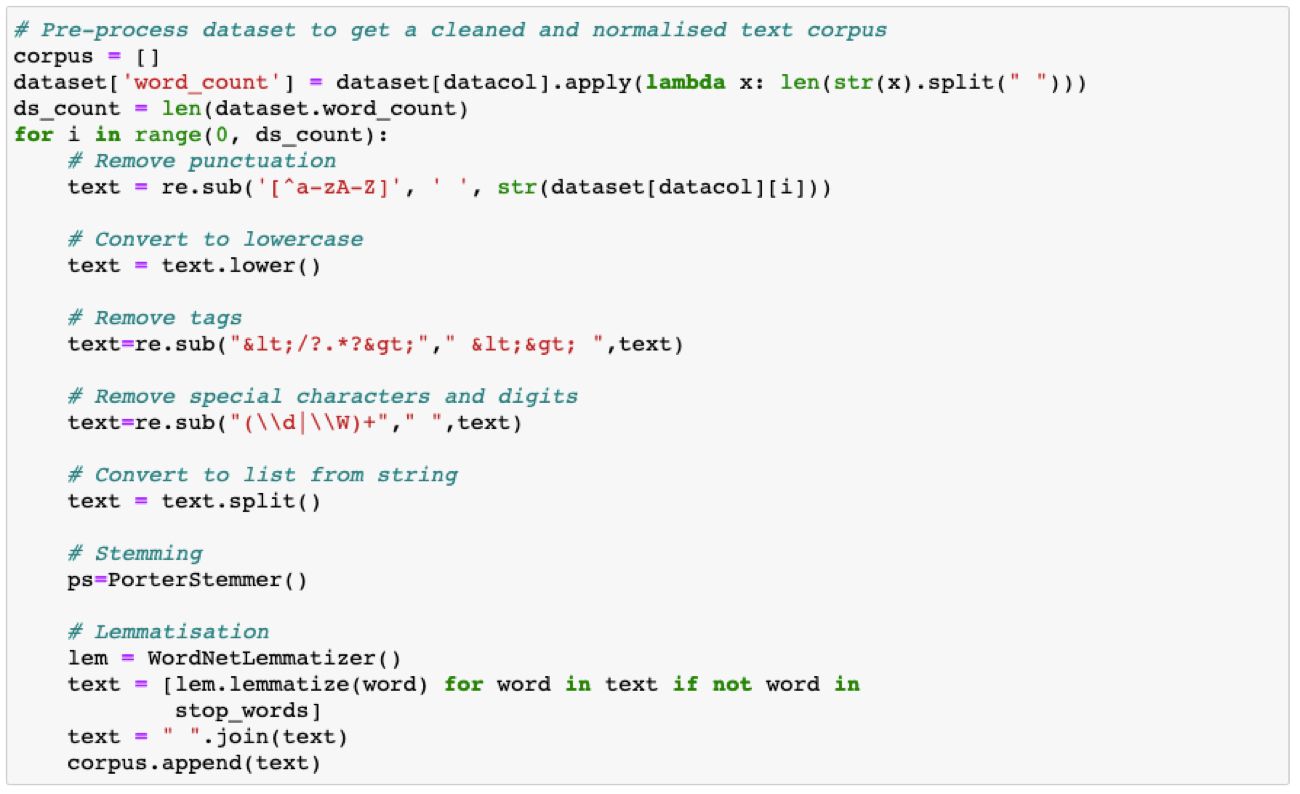
These processes all together identify a canonical representative for a set of related word forms, which allows us to assess word frequency independent of morphological (word form) variations.
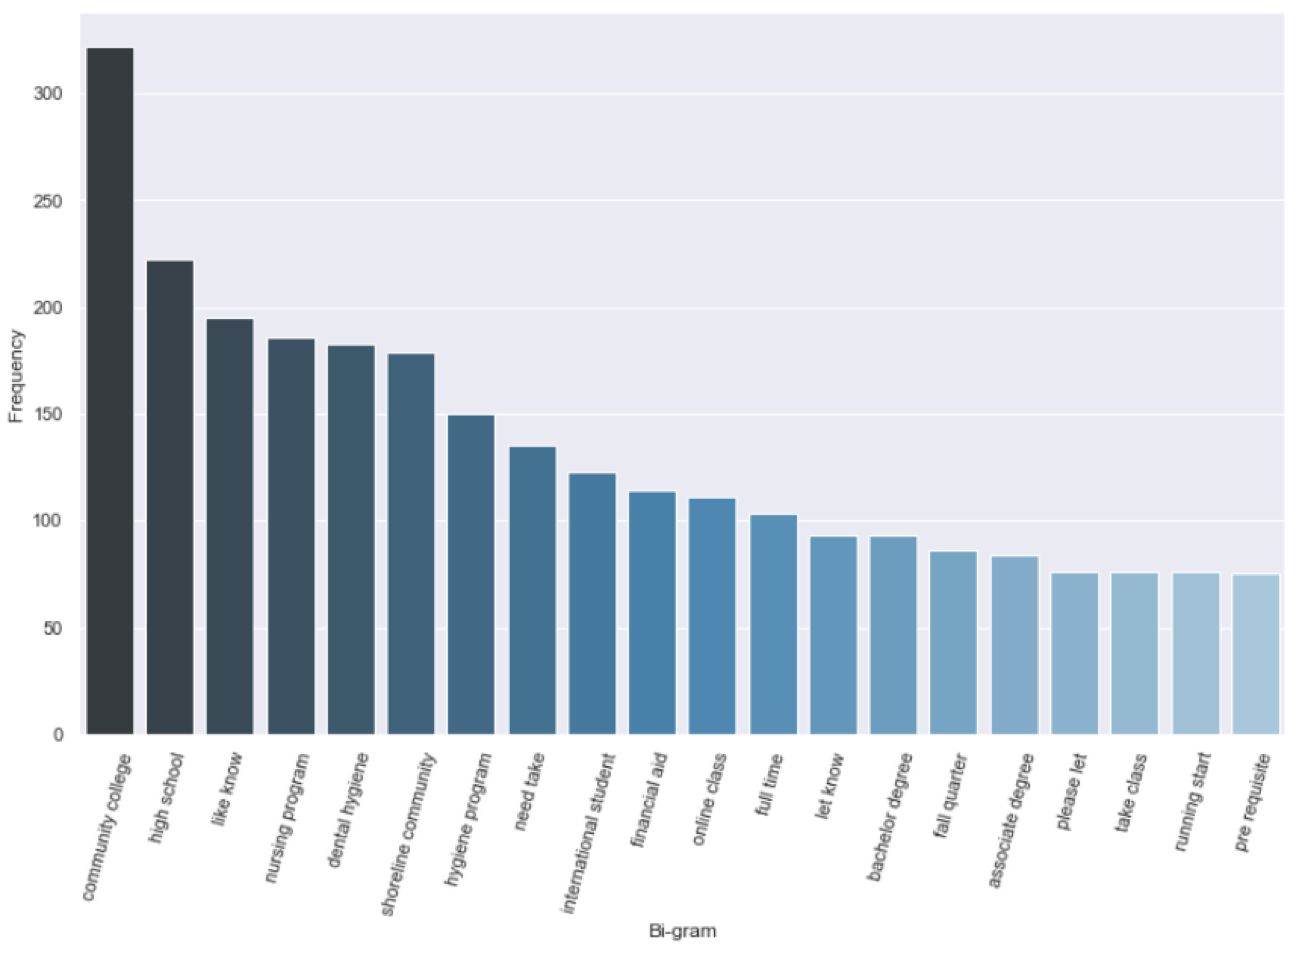
4. Extract most frequently occurring keywords and n-grams
Now we’re finally at a stage where we can generate a set of top keywords and n-grams, in our case two and three word phrases (bigrams and trigrams). These lists and charts are, of course, only a hint at all of the insight that might be contained in this text corpus, but they provide guidance on where we might need to look more closely or conduct additional research. They also offer a high level overview that is easily communicated to collaborators and stakeholders.
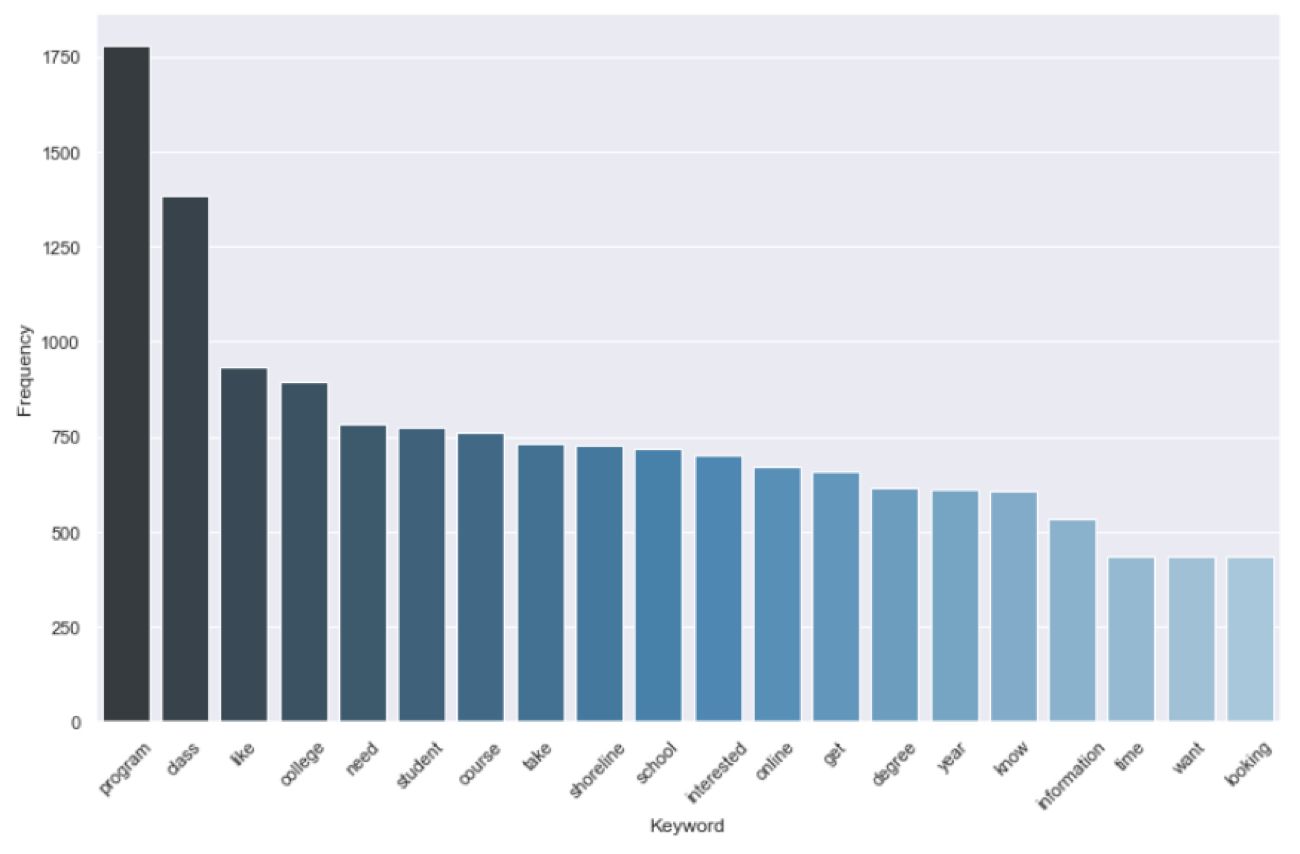
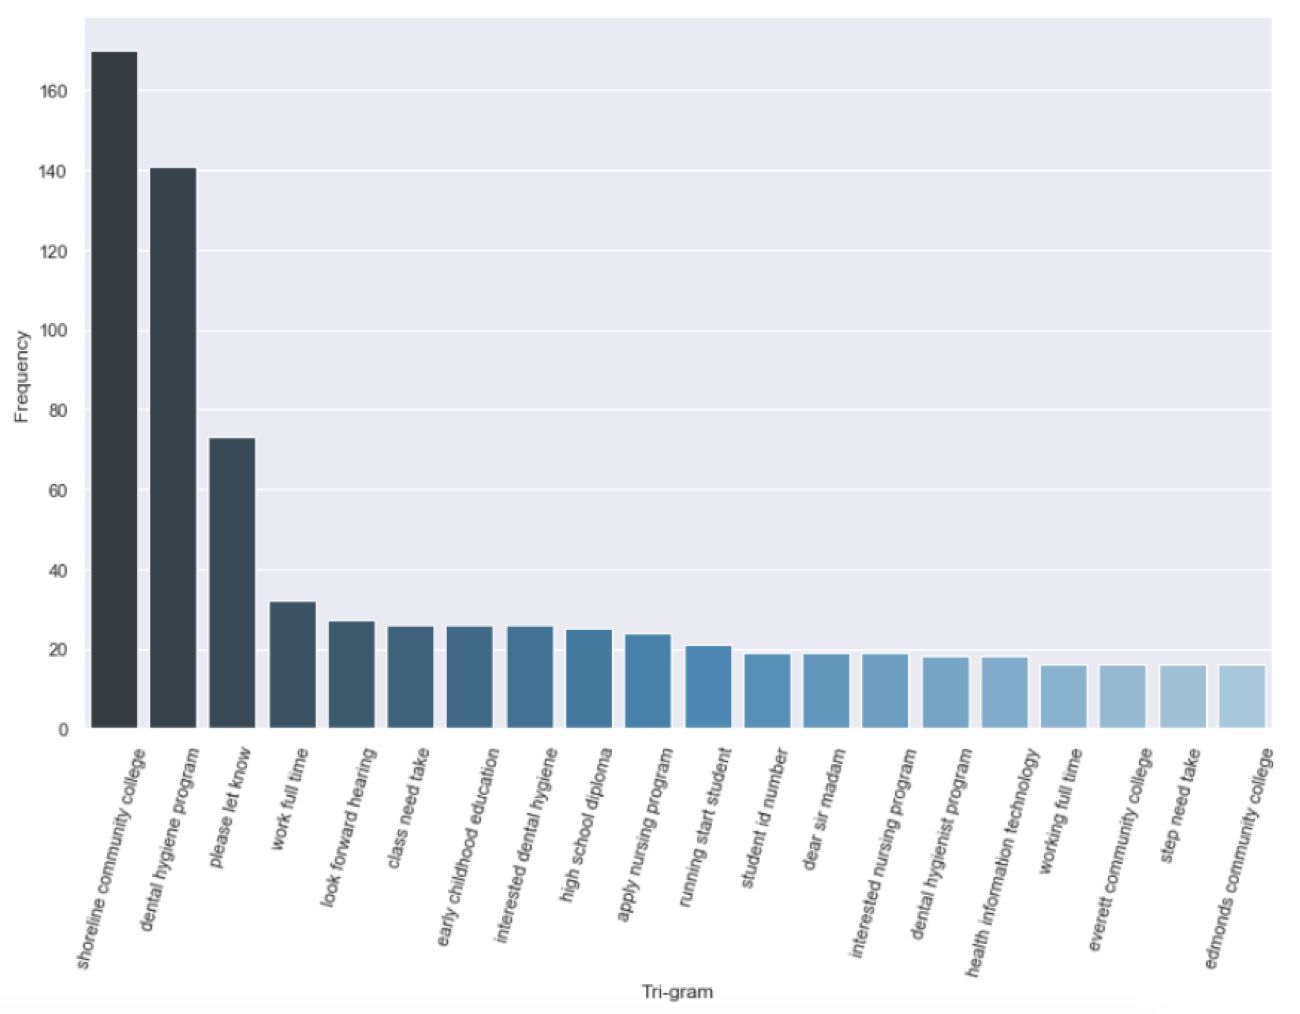
These scripts will also send a .csv of terms and frequency data for each of these views to your desktop for direct access to the compiled results. If you find that some terms are generic to your dataset—in this example “would,” “like,” “need,” and “know” are not really conveying unique meaning—you can add those to your stop words list and run the analysis again.
5. Extract a list of top TF-IDF terms
TF-IDF, short for “Term Frequency–Inverse Document Frequency,” is a numerical statistic that is intended to reflect how important a word is to a document in a collection. A term’s TF-IDF value increases proportionally to the number of times a word appears in a document and is then offset by the number of documents in the corpus that contain the word. This helps to adjust for the fact that some words appear more frequently in general. The end result is that we end up with a list of words ranked by how important they are to the corpus as a whole:
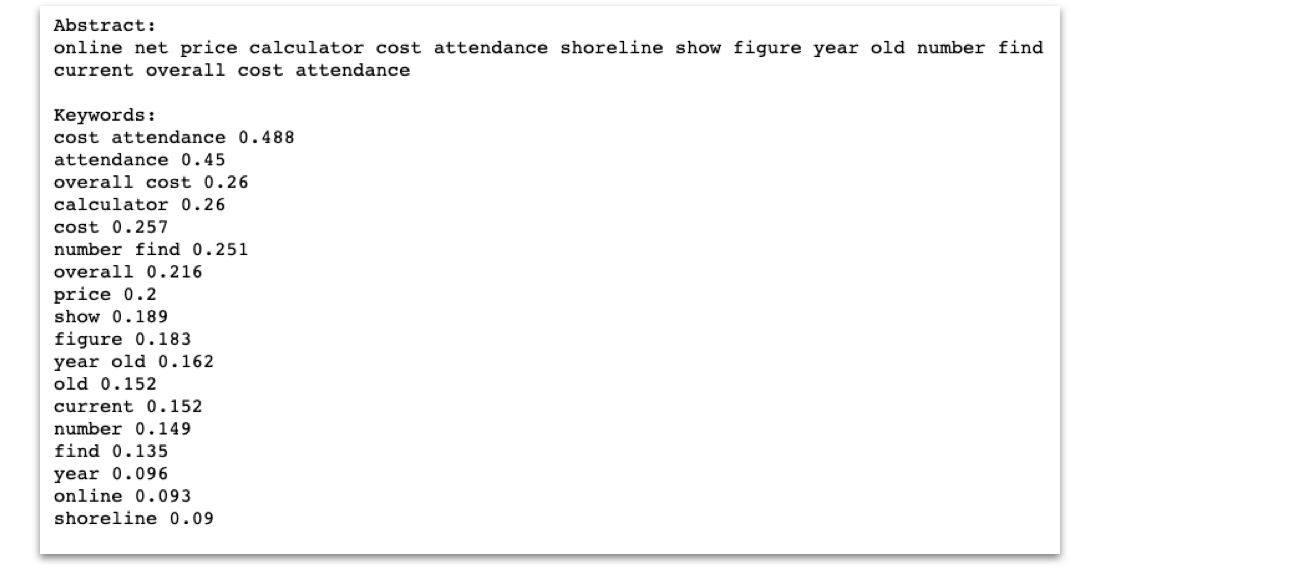
That said, I’m not going to claim I’ve yet gotten my head fully around what’s going on in the TF-IDF vectorization process. For a deeper analysis of extracting keywords via TF-IDF, check out Kavita Ganesan’s TF-IDF tutorial.
Next Steps
If you’ve dipped your toes into NLP or machine learning before, you now that these waters get deep very quickly. The goal of this article is to provide a “shallow end” that those of us new to NLP can use to get our grounding, and yet still accomplish something useful. It is written from the point of view of a beginner (me!) sharing his foothold on NLP with other beginners (you!)—and hopefully providing you with a valuable entry-level toolset you can bring to your next 8,000 row spreadsheet.
The output of this process is intended to give you a set of data points you can use to better understand the user feedback contained in large, unstructured data sets. It should also help you more easily focus future analysis and research activities. Once you’ve gotten the hang of the basic flow above, start tweaking variables and parameters. When you’re comfortable with the range of what you can do here, you’re ready to explore the many other ways to use these libraries and tools. Please do share what you learn!