
How to Choose Topics for Card Sorting
Card sorting is perhaps one of the most effective tools we have for understanding our users’ ideas about how a particular set of content should be organized. It’s lightweight, quick, inexpensive, and can add value at multiple places in the project lifecycle.
Like many “so easy anyone can do it” processes, however, there is a pitfall in setting up and running an effective card sorting exercise which, if not negotiated carefully, can leave everyone wondering where the promised insight is: selecting the right topics for cards.
In this article, I’ll share a process for getting not only the right number and kinds of cards (ideally 30 to 60, at the same level of granularity), but also for selecting the right terms for the purposes of a particular study within a particular organization. With a little bit of preparation, teamwork, and in-person (or virtual) facilitation, it’s possible to fine tune your set-up process to substantially improve both the quality of your results, and the depth of insight those results reveal.
Choosing Topics Collaboratively
Reducing and refining the list of “all possible card sorting terms” down to the 50 or so that will be tested is often framed as a “just figure it out” activity. Sometimes it’s left up to the individual UX researcher or designer. Sometimes it’s dictated to teams by clients. Often it’s some combination of the two. Without a clear sense of goals and shared purpose, any of these options leave a lot of team wisdom on the table.
An alternative approach for getting a useful and well targeted selection of cards for a given card sorting study is to make the selection process a planned, collaborative exercise. This gives you a structured, repeatable method for choosing card topics that meet project goals.
After having run these sessions for a couple years, I’ve also discovered some additional benefits to making the term selection process a team sport:
- It brings the multiple points of view into the mix
- It surfaces additional insight about the subject area, content, and stakeholders
- It helps generate buy-in from project team members and clients
- It usually turns out to be a fun activity—and in any case is way less stressful than trying to come up with a good term list on your own
Running the Exercise
To get the most out of your session, you’ll want to recruit participants from your project team, subject matter experts in your client’s organization, and stakeholders with knowledge of the project and an investment in its outcome. A handful of folks is usually enough to generate an insightful list.
The exercise itself takes 2 to 3 hours, depending on the number of participants. I use Google Sheets and Miro for both in-person and online versions of these sessions, as I’ll show in the examples below, so remote facilitation is built in. If you’re facilitating remotely, you’ll also want to arrange for conferencing software with reliable video collaboration tools.
Once you’ve got your tools in place, the overall process looks like this:
- Identify and prioritize card sort study goals
- Collect concepts
- Groom collected concepts
- Refine labels
- Test and validate candidate cards
I’ve illustrated each of these steps in detail below, with examples drawn from a recent collaboration session I conducted with a client in higher education. I’ve also shared an agenda starter template on Google Docs, which you should feel free to copy and adapt to your own project needs.
1. Identify and Prioritize Card Sort Study Goals
Goal: Make sure you know what you want to accomplish before you start collecting concepts.
Your study goals should go beyond “how do participants sort our content?” Try to put your finger on what you need to know about this particular collection of content—and how your target users think about it—in order to make effective design decisions.
For my recent higher ed client, we came up with four college-specific goals for our study:
- Learn how participants think about distinct audiences
- Learn about how participants categorize content for distinct audiences
- Learn how participants group resources that are time based, action oriented, and evergreen
- Learn what resources participants deem essential to their success at the college
This last goal was a “stretch goal”: there was a good chance we wouldn’t be able to answer it with the card sort alone, but card sort data taken together with comments and questionnaire responses would allow us to gain some insight into it.
For a tutorial on extracting keywords from free form comments, check out “A Beginner’s Guide to Keyword Extraction with Natural Language Processing.”
2. Collect Concepts
Goal: Get all the possible concepts that might help inform your study goals out on the (virtual) table.
Brainstorm and record all the possible card sort concepts that could be included to generate the insight needed to meet the goals you’ve identified. Possible sources for inspiration might include:
- existing website(s)
- sitemaps & org charts
- content inventories
- stakeholder input
- user goals and needs research
- survey output
- competitive analysis research
- third party industry research
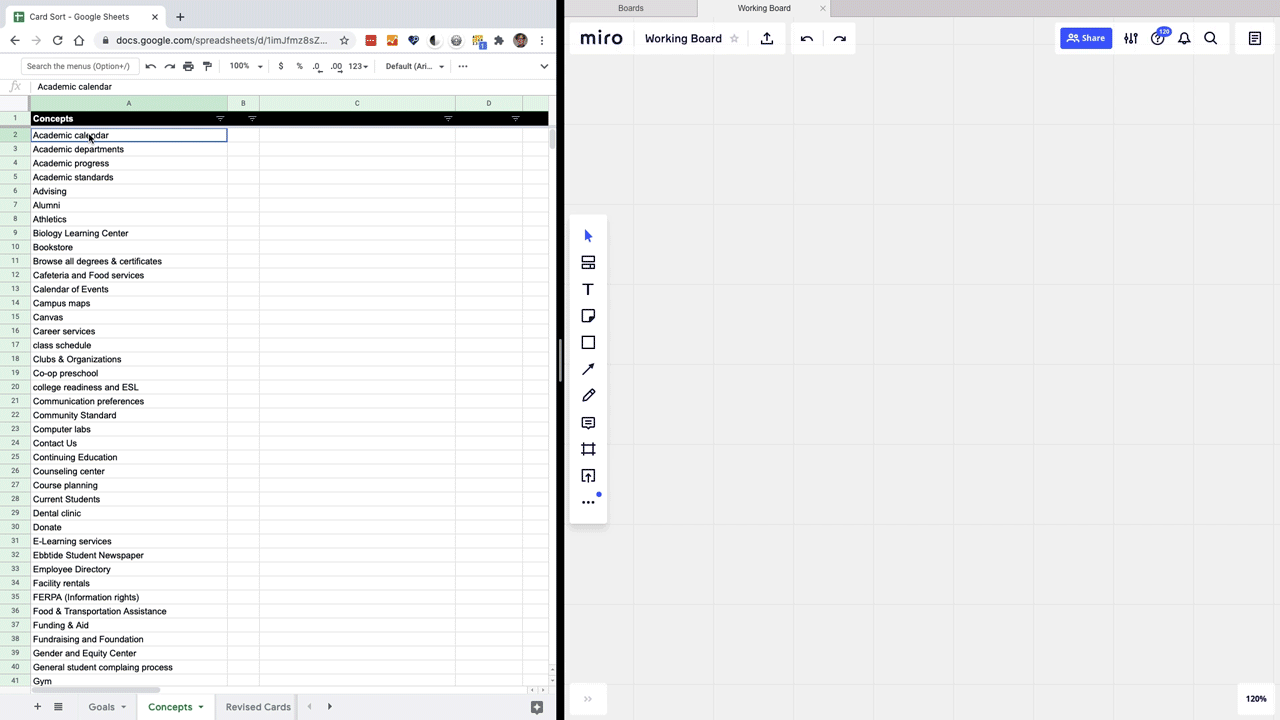
For this part of the activity, split your sources up among participants. Appoint a scribe and have participants shout out possible concepts, or have them make lists and combine them once everyone is finished. I recommend recording everything in a spreadsheet so you can easily move the data to sticky notes later. This is a generative activity, so don’t hold back—you’ll cull this word herd in the next step.
Once you’ve extracted possible card content from your sources, send your participants on a break and deduplicate and normalize what you’ve gathered. If you find terms that are clearly variants, pick one and eliminate the other. If there’s any question they might not mean the same thing, though, leave them: you don’t want to eliminate terms that could be conceptually distinct without team input.
You should end up with a list of anywhere from 80 to a couple hundred concepts. Here are the first 20 of the 97 terms we generated in my higher ed client’s session:
- Academic calendar
- Academic departments
- Academic progress
- Academic standards
- Advising
- Alumni
- Athletics
- Biology Learning Center
- Bookstore
- Browse all degrees & certificates
- Cafeteria and Food services
- Calendar of Events
- Campus maps
- Career services
- class schedule
- Clubs & Organizations
- Co-op preschool
- college readiness and ESL
- Communication preferences
- Community Standard
3. Groom Selected Concepts
Goal: Narrow your list of possible topics down to the 30 to 60 right topics for your study goals.
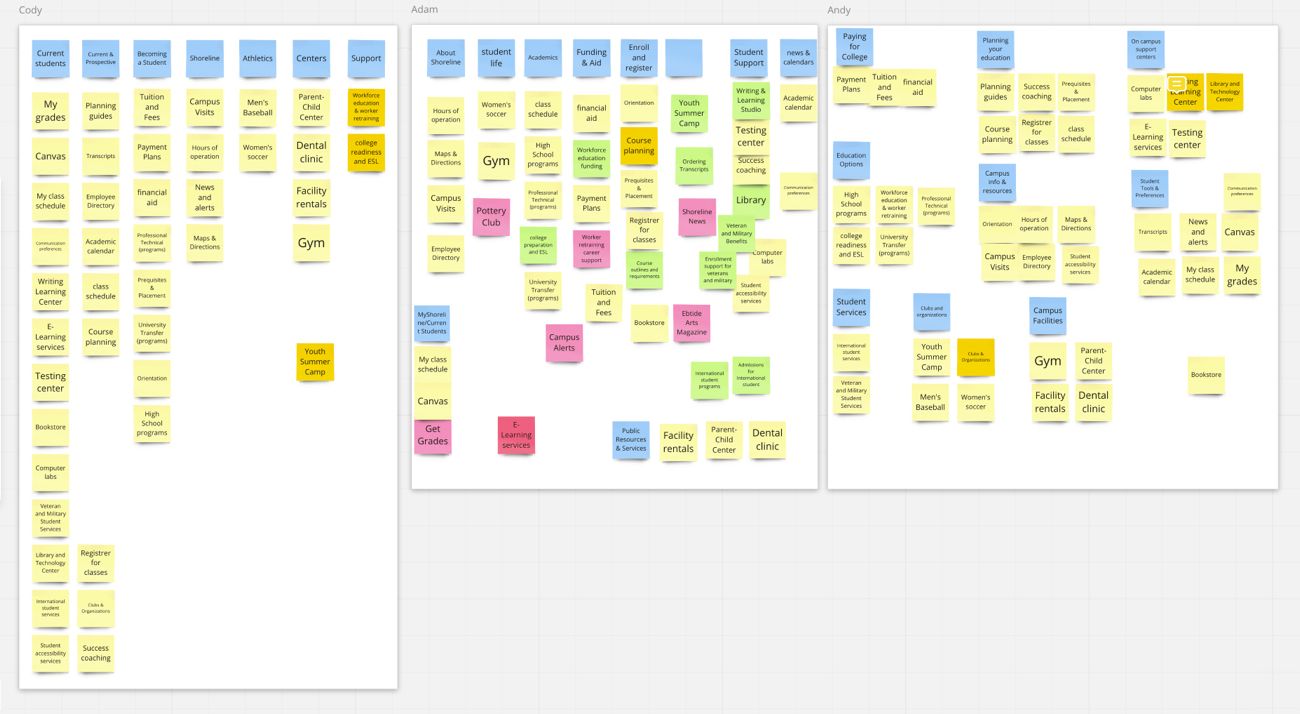
Once everyone’s back, it’s time to narrow that list of possible concepts down to a list of the right ones, given the goals you’ve identified. For this exercise, drop your list of deduplicated concepts into Miro to create a giant grid.
If I’m working with a group in person, I put this on a large screen. If we’re collaborating, I have participants open Miro on their end so that we can all actively participate. To get started, grab a “sticky note” and ask the group if it represents a concept you need to gain insight about in order to answer your research questions. If it’s not, move it outside of the frame. If it is, keep it in the frame and move on to the next one.
Once you have a half dozen or so concepts, start asking if they’re all also of the same level of granularity. If you’re starting to collect both parent and child categories, such as “financial aid” and “grants,” “scholarships,” and “loans,” pick the level of granularity that most closely aligns with your study goals and set the concepts at different levels aside. Keep going until you’ve narrowed your set down to 30 to 50 concepts.
4. Refine Labels
Goal: Eliminate patterns in labels that will tempt participants to group cards based on similar words, regardless of the concepts they represent.
Once you have a set of 30 to 50 concepts, ensure that there aren’t any unintended patterns in the labels that will cause users to group them together primarily based on the way they are phrased. This can happen when labels contain recurring words or repeating structures.
With my higher ed client, for instance, we ended up with these three concepts:
- Student accessibility services
- Student equity
- Student government
A hasty participant might be tempted to put all these cards together because they start with “Student,” ignoring the meaning of the concept we’re interested in learning about. To avoid this, we decided that “Diversity and equity” represents the college’s concept of “Student equity” equally well. We also decided that “Accessibility services” didn’t need “Student” in front of it to be clear .
Be sure to discuss and vet these choices with your collaboration team. This is one of the places you’re likely to learn more about the organization, its content, and its users, so be prepared to take notes!
5. Test and Validate Candidate Cards
Goal: Verify that your final cards can be grouped and that they respond to the goals of your study.
Now that you have a manageable list of clearly labeled cards, test them out to make sure they can all be grouped with something else and that there is sufficient variety in the concepts to meet the goals of your test.
To do this, duplicate the groomed set of terms and create a copy in Miro for each member of your collaboration group. Then take 10 minutes and have each member of the group sort the cards individually, in their own frame in Miro.
As you go, have everyone take note of cards that:
- were difficult to sort
- seemed to have no place
- seemed to duplicate other cards in context
- were at a different level of granularity than other cards in context
After everyone has finished, compare your sorted cards and notes. You should see variety in the way even a small test group organizes content—this is a good sign that our actual test will produce insightful results. If the differences between sorts are from a misunderstanding or conflicting understandings of the concept the card represents, consider revising that card. If differences come from an alternate point of view of how correctly understood concepts could be sorted, you’re on the right track.
This is also where you can check to make sure all your cards can be grouped. If there are any terms that everyone has a hard time placing, check their labels for clarity and ensure they’re at the same level of granularity as the other cards.
With my higher ed client, for example, none of us really knew how to group “Summer camps.” Since summer camps are for children of students and faculty, we rephrased “Summer camps” to “Youth summer camps.” This was clearer in context, and also aligned nicely with our goal of “learning about how participants categorize content for distinct audiences.” To our surprise, participants consistently grouped this card in a way none of us had expected—which gave us insight into our participants’ mental models we likely wouldn’t have had if the label had remained vague.
Conclusion
At the end of your collaboration session, you should end up with a set of card sorting topics fine-tuned to your study goals, and labeled to produce relevant insight. You’ll also have a card set that includes the insight of your project and client collaborators and stakeholders, and has been vetted by session participants.
In my experience, this process has been far more reliable—and far less stressful— than “just figuring it out.” Once you factor in the review and revision steps of muscling through card selection on your own, you’ll likely also find that it takes about the same amount of time (if not less).
Perhaps the best part of this approach, though, is that it brings your client along in the topic selection process. After we wrapped up the session I’ve been using as an example here, my client at the college sent me this note (used with permission):
“Getting that work done relieved so much of my stress. To me, this is the hardest task to get right when working on such a complicated system—but one of the most important.”
To get started using this process on your own projects, grab the agenda starter template from Google Docs, or download the PDF version. If getting some hands-on, collaborative help with your own design research and information architecture is more your style, do drop me a note—I’d love to hear from you!
Related Resources
This article has focused on what I’ve found is one of the more prickly problems in setting up a good card sort. For a broader overview of card sorting in general, and for more information on choosing card sort methods, recruiting participants, and analyzing results, check out these excellent resources:
- Card Sorting: Pushing Users Beyond Terminology Matches | NN/g
- Card Sorting: Uncover Users’ Mental Models for Better Information Architecture | NN/g
- Card Sorting 101 | Optimal Workshops
- How to pick cards for card sorting | Optimal Workshops
- Card Sorting | Usability.gov